
How it works and how it connects
The whole path in detail: what happens to traffic inside the appliance, what has to be done on your side and how long the rollout takes.
- change in the existing network
- 1change in the existing network
- patch cords for the connection
- 2patch cords for the connection
- software boot time
- under 5 minsoftware boot time
The principle: the appliance listens to a copy of the traffic
A modern switch can duplicate all traffic passing through selected ports onto one separate port. The feature is called port mirroring, or SPAN. It exists on practically all managed network equipment and does not affect data transmission.
SOFIT PAK connects exactly to such a mirror port. It receives an exact copy of the traffic and dissects it locally, without taking part in transmission. From the network point of view the appliance does not exist: it routes nothing, filters nothing and delays nothing.
The second network port connects to the management segment. Through it the administrator reaches the web interface, the appliance delivers events to a SIEM and sends notifications. Both interfaces work at the same time but cannot live in the same subnet.
Connection scheme
Left to right runs the ordinary path of your network traffic. A copy branches downwards for analysis.
The traffic copy flows one way: the appliance only listens
LAN2 receives the copy · LAN1 management
Web interface, event export, notifications to the duty officer
What is on the device
Every connector is shaped so it cannot be plugged in the wrong way. No tools are required for the installation.
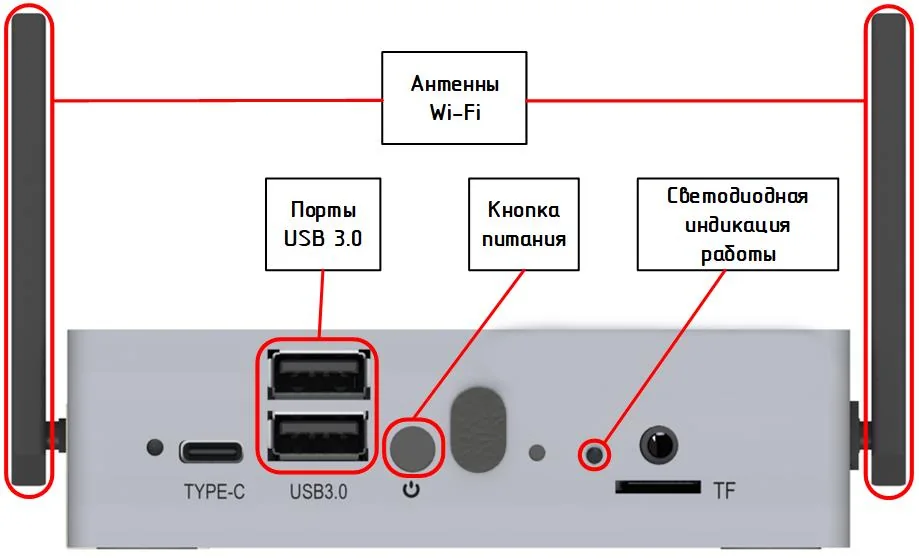
Front panel
Power button, status indicator, two USB 3.0 ports and a Type-C connector. Wi-Fi antennas sit on the sides of the chassis.
- Power button: one press powers on, one press powers off
- Two colour indicator: red means power is present, turquoise means storage activity
- Two USB 3.0 ports and a Type-C connector
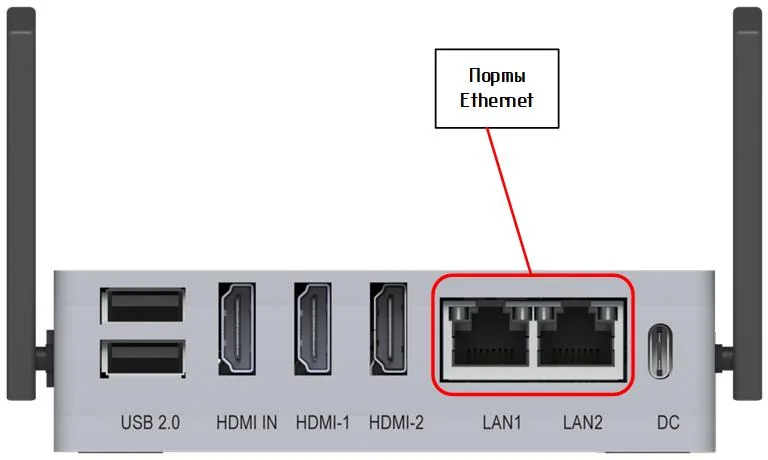
Rear panel
Two Ethernet ports LAN1 and LAN2, three HDMI connectors, two USB 2.0 ports and a Type-C power connector.
- LAN1: management segment, web interface, event export
- LAN2: receives the traffic copy from the mirror port
- Type-C power connector for the external power supply
Startup sequence
The work is performed by a system administrator. Below is the sequence from the operating manual, in full.
- 01
Enable port mirroring
On the switch or router, port mirroring is enabled: traffic from the selected ports is duplicated onto the port the appliance will use. This is the only change in the existing network.
Done by your network administrator, takes a few minutes
- 02
Place the device and connect the cables
The appliance goes on a desk or another stable horizontal surface. An RJ-45 patch cord connects LAN2 to the mirror port, and LAN1 to the management network or directly to the administrator computer for initial setup.
Cables go in first, power second
- 03
Apply power
The supplied power adapter plugs into the Type-C connector on the rear panel and into a 220 V socket. A surge protector or an uninterruptible power supply is recommended. The device powers on automatically when voltage is applied.
220 V with up to 10 % deviation, consumption no higher than 170 W
- 04
Log into the web interface
The software boots in up to five minutes. After that the administrator opens a browser, Google Chrome is recommended, and enters the appliance network address. By default it is 192.168.0.1 on LAN1 and 192.168.0.2 on LAN2.
The system administrator password is changed on first login
- 05
Configure time and network
Time, time zone and NTP servers come first: task schedules, log records and notification delivery all depend on them. Then the addresses of both network interfaces, gateways and DNS are configured.
Time is configured before any work with the other modules
- 06
Start tasks and connect alerting
Network and vulnerability scanning tasks are created with the required schedule, critical files are placed under control, email and Telegram delivery is configured, and SIEM export is added if needed.
After this the appliance runs without daily administrator involvement
What is needed on your side
The list is short and requires no purchases.
A managed switch supporting port mirroring
Practically all modern managed network equipment can duplicate a port. If that is not available at the required point, we design the scheme separately.
A 220 V socket near the installation point
Preferably through a surge protector or an uninterruptible power supply, to shield the appliance from electrical noise.
Two RJ-45 patch cords
One to the mirror port, the second to the management segment.
A computer with a browser on the same network
For setup and daily work. Google Chrome is recommended. Nothing has to be installed on it.
A room with an ordinary climate
Operating temperature from +10 to +35 degrees, a dry heated room with no moisture ingress.
Access for integrity monitoring, if you need it
Watching files on servers requires an account and an enabled protocol: SSH, WinRM, SMB or FTP.
What happens after the rollout
Traffic monitoring and Wi-Fi control start working immediately and need no configuration: they analyse what they see. Network scanning and vulnerability detection run on a schedule that you define yourself.
Daily operation then looks like this: the duty officer receives notifications in Telegram or email for the event types you enabled, and once a day opens the Analysis module, where events from every module sit on one screen.
Maintenance amounts to a technical inspection at least once every six months: check that the chassis is intact, remove dust with a dry cloth and inspect the power cable. Software updates are installed from the web interface in one click.
We will prepare a quote for your network
Tell us about your infrastructure: how many sites, which switch sits in the core, whether you already run a SIEM. We will pick the edition and the connection scheme, and calculate the cost.
- We reply within one business day
- We design the connection scheme for your topology
- We show the interface on a live demo unit